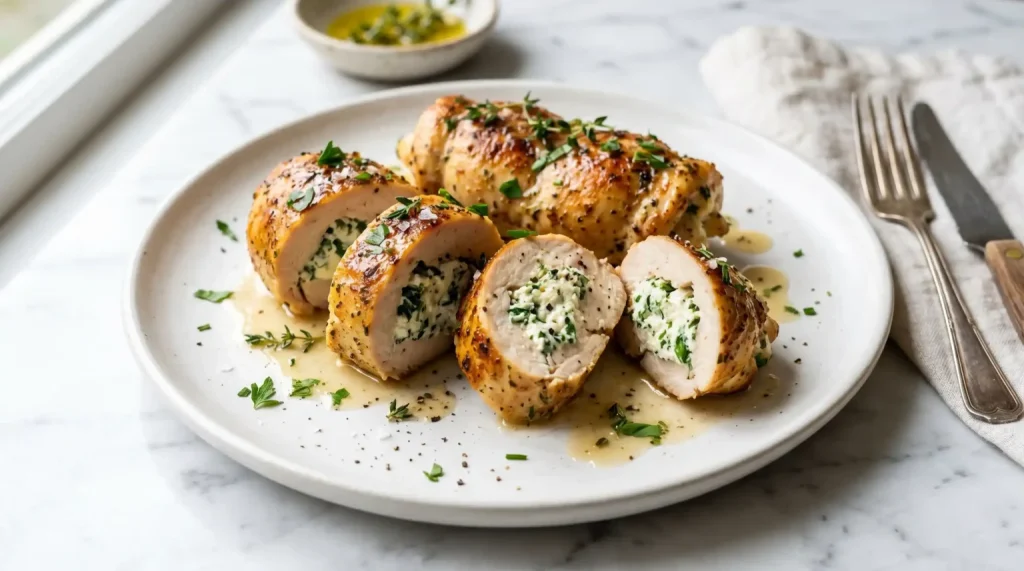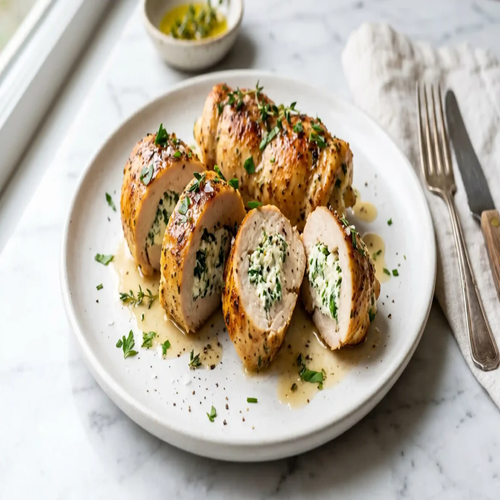
Herbed Ricotta Stuffed Chicken Rolls-You know that feeling when you put a dish on the table and people genuinely go quiet? That is exactly what happens with Herbed Ricotta Stuffed Chicken Rolls. Tender chicken wrapped around creamy, herb-packed ricotta filling — it looks like you spent hours. You didn’t.
Prep Time: 20 minutes | Cook Time: 30 minutes | Total Time: 50 minutes | Servings: 4 people (2 rolls per person)
I first made these on a random Wednesday when I needed to use up leftover ricotta and fresh herbs from the fridge. What I pulled out of the oven looked restaurant-worthy. My family asked if I had ordered it. Honestly, that’s the best compliment a home cook can get.

The best part? This recipe takes under an hour from start to finish. Whether you’re cooking for guests or just want to eat something genuinely great on a weeknight, Herbed Ricotta Stuffed Chicken Rolls are the answer. Let’s get into it.
Ingredients
Everything in this list works hard. Nothing is here for decoration, and you probably already have most of it at home. This recipe serves 4 people — about 8 rolls total.

For the Chicken
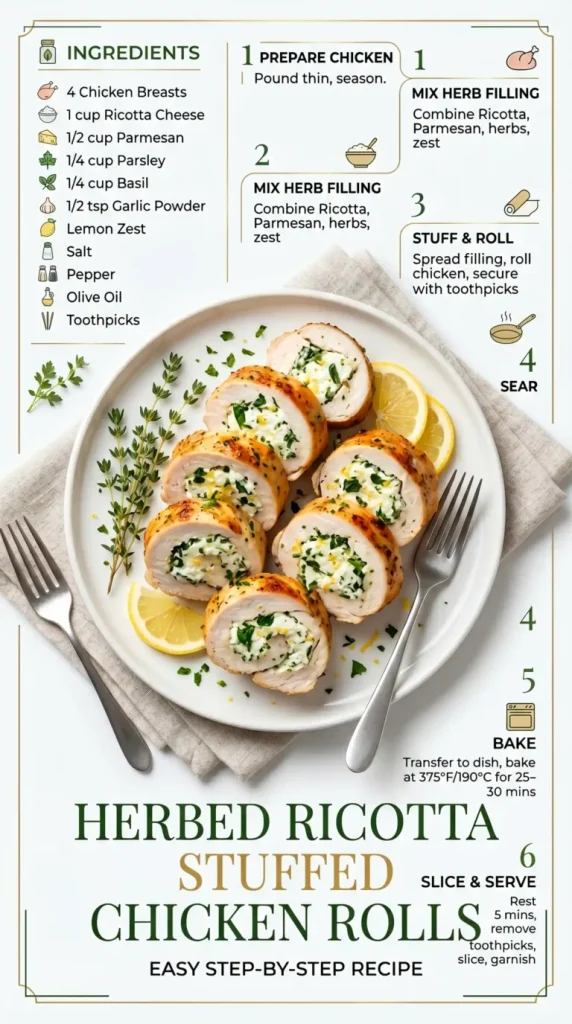
4 large boneless, skinless chicken breasts (about 170g / 6 oz each)
1 teaspoon garlic powder
1 teaspoon smoked paprika
1/2 teaspoon salt
1/2 teaspoon black pepper
1 tablespoon olive oil (for searing)
8 to 10 toothpicks or kitchen twine for securing the rolls
For the Herbed Ricotta Filling
1 cup (250g) full-fat ricotta cheese
1/3 cup (35g) freshly grated Parmesan cheese
2 cloves garlic, finely minced
2 tablespoons fresh basil, finely chopped
1 tablespoon fresh parsley, finely chopped
1 tablespoon fresh chives, finely chopped
1 teaspoon fresh thyme leaves (or 1/2 teaspoon dried)
Zest of 1 lemon
1/4 teaspoon red pepper flakes (optional)
Salt and black pepper to taste
Now For the Pan Sauce (Optional but Incredible)
1/2 cup (120ml) dry white wine or chicken broth
1/2 cup (120ml) chicken broth
1 tablespoon unsalted butter
1 teaspoon fresh lemon juice
1 tablespoon fresh parsley, chopped (for finishing)
Equipment You Will Need
You don’t need any special gear here. Just standard kitchen tools you likely already own.
1. Sharp chef’s knife and cutting board
2. Meat mallet or rolling pin (for pounding the chicken flat)
3. Plastic wrap or a zip-lock bag (for pounding)
4. Mixing bowl (for the ricotta filling)
5. Oven-safe skillet or cast iron pan
6. Toothpicks or kitchen twine
7. Tongs for turning the rolls
8. Meat thermometer for checking doneness
How to Make Herbed Ricotta Stuffed Chicken Rolls
Step 1: Preheat the Oven
Start by preheating your oven to 375 degrees Fahrenheit (190 degrees Celsius). You want the oven fully up to temperature before your chicken rolls go in. A properly preheated oven means even cooking all the way through, with no cold or underdone spots in the middle. While it heats up, go ahead and get everything else ready.
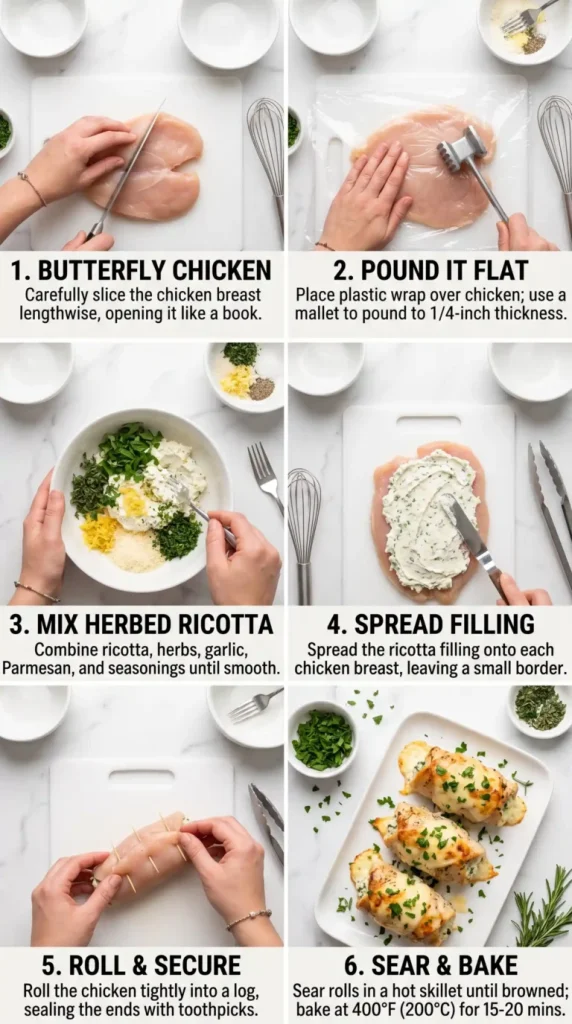
Step 2: Butterfly and Pound the Chicken
Place one chicken breast on your cutting board. Hold it flat with one hand and use your knife to slice horizontally through the middle — but not all the way through. Open it up like a book. This technique is called butterflying, and it gives you a wider, thinner piece of chicken that’s perfect for rolling.
Now lay a sheet of plastic wrap over the butterflied breast and use a meat mallet or rolling pin to gently pound it to an even thickness of about 1/4 inch (6mm). Even thickness is crucial here. If one end is thicker than the other, it won’t cook evenly and you’ll end up with dry edges and an undercooked center. Take your time with this step — it makes a real difference.
Repeat this with all four chicken breasts. Season both sides of each piece lightly with garlic powder, smoked paprika, salt, and black pepper. Set them aside while you prepare the filling.
Step 3: Make the Herbed Ricotta Filling
Add 1 cup of full-fat ricotta to your mixing bowl. Spoon in soft, fluffy ricotta gives you the creamiest filling, so avoid the grainy, low-fat versions here. IMO, this is not the moment to cut corners
Add the grated Parmesan, minced garlic, chopped basil, parsley, chives, and thyme. Grate in the lemon zest directly over the bowl — the fresh citrus oil that comes off the zest adds a bright, fragrant lift that balances the richness of the cheese perfectly.
Add the red pepper flakes if you want a subtle kick. Season with a pinch of salt and a few cracks of black pepper. Mix everything together thoroughly with a fork or spoon until well combined. Taste the filling. Does it taste good on its own? It should — the chicken is the wrapper, not the flavor source.
Step 4: Stuff and Roll the Chicken
Lay one butterflied, pounded chicken breast flat on your cutting board. Spoon about 2 to 3 tablespoons of the herbed ricotta filling onto the center of the chicken, spreading it out evenly but leaving a 1/2-inch border around all edges. Too much filling and it will squeeze out during cooking. Too little and you’ll barely taste it. Two to three tablespoons is the sweet spot.
Starting from one short end, carefully roll the chicken over the filling — firmly but gently. Think of it like rolling a small burrito. Tuck in the sides slightly as you roll if possible to keep the filling contained. Once rolled, secure the seam with 2 toothpicks pushed through at an angle. Or tie the roll with a piece of kitchen twine to hold everything together tightly.
Repeat this process for all four chicken breasts. Line the finished rolls up on a plate and set them nearby. Have you ever rolled something up and felt a small surge of pride? That’s normal. These rolls look genuinely impressive even before they hit the pan.
Step 5: Sear the Rolls
Heat 1 tablespoon of olive oil in your oven-safe skillet over medium-high heat. You want the oil to shimmer slightly before adding the chicken — that’s how you know it’s hot enough for a proper sear. If the oil smokes heavily, turn the heat down a notch.
Add the chicken rolls seam-side down first. Let them sear undisturbed for 2 to 3 minutes until a golden-brown crust forms on that side. Use tongs to rotate the rolls and sear all sides — about 2 minutes per side. This searing step does two important things: it locks in moisture and builds a beautiful caramelized crust that adds serious flavor. Don’t skip it.
Step 6: Finish in the Oven
Once all sides are seared and golden, transfer the entire skillet into your preheated oven. Bake for 18 to 22 minutes until the chicken is fully cooked through. The safest way to check doneness is with a meat thermometer — the internal temperature should read 165 degrees Fahrenheit (74 degrees Celsius) at the thickest part of the roll.
Avoid cutting into the rolls to check them. Every time you cut into the chicken, you let the juices escape and the filling can leak out. Use the thermometer — it takes 5 seconds and saves your dinner.
Step 7: Make the Pan Sauce (Optional)
Remove the chicken rolls from the skillet and let them rest on a plate, loosely covered with foil. Place the skillet back on the stove over medium heat. Pour in the white wine or extra chicken broth and let it sizzle — use a wooden spoon to scrape up all the brown bits stuck to the bottom of the pan. Those bits are pure flavor.
Add the remaining chicken broth and let the sauce simmer for 3 to 4 minutes until it reduces slightly and concentrates. Turn off the heat and stir in the butter and fresh lemon juice. The butter gives the sauce a silky, glossy finish. Spoon it over the chicken rolls right before serving. FYI, this sauce elevates the dish from great to genuinely unforgettable.
Step 8: Rest, Remove Toothpicks, and Serve
Let the chicken rolls rest for at least 5 minutes before slicing or serving. Resting allows the juices to redistribute through the meat so every bite stays moist. Remove all toothpicks or twine before plating. Slice each roll in half diagonally to reveal the beautiful swirl of herbed ricotta inside. Plate them up, spoon the pan sauce over, and finish with a sprinkle of fresh parsley.
Tips for Perfect Herbed Ricotta Stuffed Chicken Rolls
A few simple habits make a big difference in how this dish turns out. Keep these in mind every time you make it.
Pound evenly: Uneven thickness leads to uneven cooking. Take the time to pound each breast to a consistent 1/4 inch.
Full-fat ricotta only: Low-fat ricotta is watery and won’t hold its shape inside the roll. Stick with full-fat for the best texture.
Don’t overfill: More filling sounds better but actually causes the roll to burst open. Two to three tablespoons is the right amount.
Sear before baking: The sear builds a crust that keeps moisture locked in and adds a depth of flavor you simply can’t get from baking alone.
Rest before cutting: Give the rolls at least 5 minutes to rest after coming out of the oven. The difference in juiciness is significant.
What to Serve With Herbed Ricotta Stuffed Chicken Rolls
These rolls pair beautifully with a variety of sides. Here are a few combinations that work really well together.
Garlic roasted potatoes: Crispy, hearty, and great for soaking up the pan sauce.
Steamed or roasted asparagus: Light, fresh, and a natural color contrast on the plate.
Simple arugula salad with lemon dressing: The peppery bitterness cuts through the richness of the ricotta filling.
Creamy polenta or mashed cauliflower: Great base options that absorb the pan sauce beautifully.
Crusty bread: Because you absolutely need something to mop up that sauce.
How to Store and Reheat
Good news — these rolls reheat really well, which means leftovers are genuinely worth looking forward to.
Refrigerator: Store in an airtight container for up to 3 days.
Freezer: Freeze cooked, cooled rolls individually wrapped in plastic for up to 2 months. Thaw overnight in the fridge before reheating.
Reheating: Cover with foil and reheat in a 325F oven for 12 to 15 minutes. Avoid microwaving as it makes the chicken rubbery.
Frequently Asked Questions
Can I make the filling ahead of time?
Yes, and it actually improves the flavor. Mix the herbed ricotta filling up to 24 hours in advance and store it covered in the fridge. The herbs have more time to infuse into the cheese, giving you a more intensely flavored filling.
Can I use chicken thighs instead of breasts?
Absolutely. Boneless, skinless chicken thighs work well and actually stay juicier than breasts. They are a bit trickier to pound flat evenly, but the result is delicious. Increase the baking time to 25 minutes and verify with a thermometer.
What herbs can I swap in or out?
The base herbs — basil, parsley, and thyme — work brilliantly together. But you can swap in rosemary, tarragon, dill, or oregano based on what you have. Just keep the total herb quantity roughly the same so the filling doesn’t become overwhelming.
My filling leaked out during cooking. What went wrong?
Two likely causes: you overfilled the rolls, or the seam wasn’t secured tightly enough. Next time, use two toothpicks per roll pushed at opposing angles, and make sure the seam goes down into the hot pan first during searing — it helps seal it.
Can I make this recipe dairy-free?
You can substitute a dairy-free ricotta made from cashews or tofu, and skip the Parmesan or use a dairy-free hard cheese alternative. The texture and flavor will differ slightly, but the result is still a tasty stuffed chicken roll worth making.
Final Thoughts
The Herbed Ricotta Stuffed Chicken Rolls recipe is one of those dishes that punches way above its effort level. It looks impressive, it tastes outstanding, and it comes together in under an hour. That is a rare and beautiful thing in the kitchen. Whether you serve these at a dinner party or eat them straight from the pan on a Tuesday, they deliver every time. The creamy herbed filling, the golden crust, and that simple pan sauce — everything works in harmony. This one earns a permanent spot in your weekly rotation. Now go make it.